
How to Punch Needle? The Ultimate Beginner's Guide
If you are just starting to learn how to punch needle and are looking for guidance, our step-by-step instructions will help. This comprehensive guide is to help beginners learn the ins and outs of punch needle embroidery with an easy-to-understand tutorial. Anyone can do it!
How To Thread A Punch Needle
The punch needle set includes a punch needle and a wire threader. Threading a punch needle is easy and can be done in two different ways.
Method A
Step 1: Take your threader and insert it into the end of the punch needle from the needle point, pushing it all the way through the barrel until it comes out on the opposite end of the punch needle.
Step 2: Take the end of your yarn and insert it through the wire loop at the end of the threader.
Step 3: Pull the threader back through the barrel of the punch needle, gently guiding the yarn through the tip end of the needle.
Step 4: Insert the wire threader through the back of the eye, place the end of the yarn into the threader, then pull the threader out of the needle eye. Adjust the yarn to leave a short tail, your punch needle is now ready to use.

Method B
Step 1: Insert the wire loop of your threader into the open end of the punch needle from the BACK of the eye. Gently push the threader through the entire barrel of the needle until it emerges from the opposite end.
Step 2: Take the end of your yarn and insert it through the wire loop at the end of the threader.
Step 3: Guide the threader through the barrel of the punch needle, pulling it gently as you guide the yarn through the eye of the needle. Adjust the yarn to leave a short tail, now it's ready to use.

To achieve your desired loop height, the adjustable punch needle comes with four different settings - A, B, C, and D. With a simple twist of the handle, you can easily adjust the settings. If you are a beginner, we recommend setting C to get started.
How To Punch Needle
Once you have threaded a punch needle, please follow the steps below to begin punching.
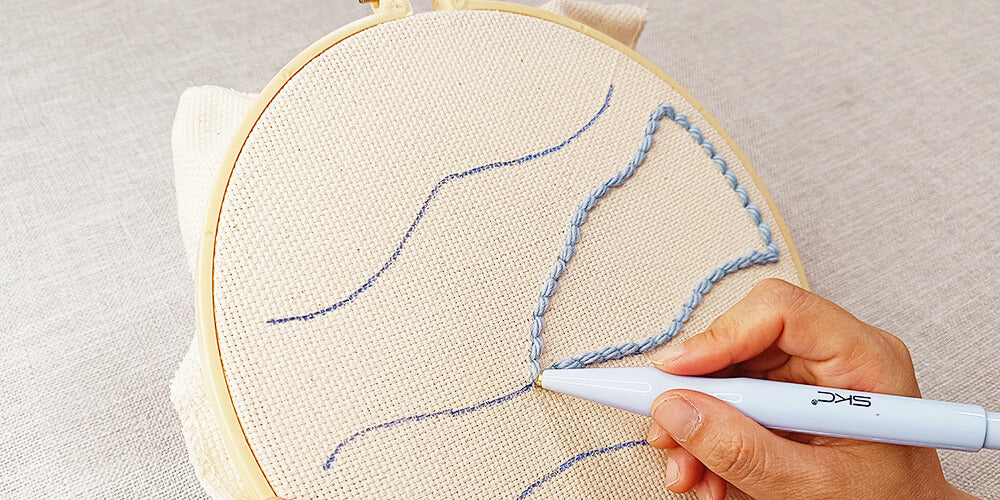
Step 1: Hold your punch needle just like a pen. As you punch, you must always keep the bevel pointing in the same direction as you are punching.
Step 2: Start from the outline of the pattern and push your punch needle down through the monk's cloth. Making sure to punch all the way down, as far as the punch needle can go (until the handle touches the surface of the fabric). Hold the needle firmly in place and flip your frame over, pull on the yarn to let the tail comes out from your needle.

Step 3: Return to the front side and slowly pull your needle up through the monk’s cloth. Do not lift the punch needle too high, or you will get uneven loops and even pull the loops right out. Just slide the needle along the surface of the monk’s cloth instead of lifting it. Follow the outline of pattern to punch the next stitches. You are advised to have each stitch to be about three holes from each other in the monk’s cloth. This guarantees that the space between each stitch remains uniform.
Step 4: This process should be repeated until you return to the first stitch. As previously stated, always keep that the bevel side of your punch needle points in the same direction you wish to punch. If you need to change directions, make sure to fully insert the needle into the monk's cloth, you can either turn the frame while holding the needle to continue in the same direction, or hold the frame steady while turning the needle to punch in a new direction.

Step 5: To start the second row, punch the needle close to the first row and ensure that the stitches are tightly joined without any gaps or overlaps. Use a staggered brick pattern for the stitches, and work in a spiral towards the center as you add more rows. Repeat this process until the section is completely filled.
Step 6: To finish a section or switch colors, let your needle punched through the monk’s cloth and flip over the frame. Then simply cut the yarn and remove needle from the cloth. Trim the yarn tail to be the same length as the other loops.
That's it! Your section is now done and you can start a new section using the same techniques.

Learning the basic techniques of how to use a punch needle is easy and fun. If you make a mistake or are unhappy with a part of your project, it is simple to pull out the offending section and repunch. In no time, you will find yourself caught up in the soothing rhythm as you create beautifully punched pieces.
How To Fix Mistakes
Mistakes can occur due to various reasons. Please check below for some common ones:
- When the yarn gets stuck on something, preventing it from freely filling into the punch needle.
- When there is a knot or tangle in your yarn.
- When the bevel side of your punch needle is not facing the direction you are moving.
- When you do not punch the needle all the way down.
- When you lift your punch needle too high.
- When you make uneven or unsatisfactory stitches and need to redo them.
Regardless of the type of mistake you've made in your project, fixing it is quite easy. Here are step-by-step instructions to help you correct punch needle mistakes:
Step 1: Identify the mistake: Locate the spot where the mistake occurred and carefully unravel the stitches up to that point. Since there are no knots in needle punching, the yarn should easily come undone.
Step 2: Reinsert the yarn: Once you have removed the problematic area, you will have an extended length of yarn. Position the tip of your punch needle next to your last intact stitch and gently pull the yarn through until you reach the end.
Step 3: Repair the monk's cloth: The cloth may have holes from the previous punching. If this concerns you, use your fingernail or the tip of your needle to guide the weave back to its original pattern. This will restore your foundation to its original appearance.
Step 4: Continue with your project: Now that you have fixed the mistake, you can resume working on your punch needle project.
Remember to be patient and take your time when fixing mistakes in your punch needle project. With a little effort and care, you can achieve the desired results.

Cleaning Up Your Loops
After completing your punching and turning your project over to the loop side, you may notice uneven loop heights, jagged borders, or disconnected lines. Don't worry, as this is a common issue that can be easily fixed with a few quick clean-up steps. Follow these tips to improve your project:
- Trim any uneven yarn tails or loops to even out the height of the loops.
- Check for loops that are out of place, twisted, flattened, or stuck, and use your punch needle, scissors, or fingers to adjust them as necessary.
- Take a step back and examine your project from different angles to ensure it looks great on both sides.
Remember, don't be afraid to experiment with different techniques to achieve the look you like best. With a little bit of practice and patience, you'll be able to create stunning punch needle projects!

How To Finish The Back Of Punch Needle Embroidery
After completing your punch needle design and tidying up your work, it's time to prepare it for display! One great way to finish your project is by hemming the edges to the back of the hoop. Below, you'll find two different methods for achieving this.
Method 1: The Running Stitch
- Thread a large-eyed yarn needle with yarn.
- Sew a running stitch around the raw edge of the fabric by alternately pulling the yarn up through the material and then down. The stitches don't need to be perfect, but keep them around one inch long.
- Once you've completed a full circuit around the edge, pull the yarn tight to gather the monk's cloth securely.
- Tie off the yarn to keep the fabric firmly in place and trim the end. Optionally, you can trim any excess fabric on the sides for a neater appearance.

Method 2: Glue
- Use scissors to trim any excess fabric around the edges of your embroidery hoop, leaving a small border of fabric around the hoop.
- Apply glue to the back of the hoop, along the edge of the fabric.
- Fold the excess fabric over the edge of the hoop and press it firmly into the glue.
- Allow the glue to dry completely.
Congratulations on completing your punch needle masterpiece! It's now ready to take center stage and show off your incredible skills. Display it proudly and enjoy the fruits of your labor.
Troubleshooting
My stitches keep pulling out.
- Ensure that you press the punch needle all the way down. If your loops are too short, they can easily slip out.
- When making stitches, make sure to keep your needle as close to the surface of the monk's cloth as possible. Be careful not to lift your needle too high, as it can cause your loops to come undone. Instead, focus on smoothly dragging the needle along the fabric's surface to create your stitches.
- Free-flowing yarn is crucial for an effortless punch needling experience. If your yarn is tangled or knotted, smooth it out. Make sure it isn't catching on your frame or getting stuck under your arm, leg, or couch cushion. If your yarn ball refuses to stay in place, try keeping it in a bowl or basket.
My loops are uneven
- The tips listed above will also help if your loops are uneven. Review these steps to see if they can solve the issue.
- Make sure that your monk’s cloth is tightly installed in your frame. The tension required for even loops can’t be achieved if your foundation cloth is loose. STRETCH IT TIGHT!
There are gaps between my loops
- If your stitches are too large, they can create gaps.
- You did not fill enough loops in that area.
- Staggering your stitches ensures that your design area is completely covered. Make sure that your stitches are not parallel to each other.

Punch Needle Tips and Tricks
Now that you've learned how to punch needle, here are some tips and tricks to get the most out of your punching:
- Push your punch needle into the cloth all the way down, until the handle touches the cloth.
- Remember to have the beveled side of your punch needle facing the direction you are going.
- Avoid lifting your punch needle too high as you punch. Keep it close to the surface of the cloth to prevent short loops or pulling loops out completely.
- Ensure that your rows are not too far apart and avoid making your stitches parallel. Tightly placed rows and staggering the stitches in a brick pattern help prevent gaps from forming and enhance the beauty of the stitchwork.
- Take your time. Punch needle can be a relaxing and meditative hobby, so don't rush through your projects. Enjoy the process and pay attention to the details. This will help you create beautiful, high-quality designs.
- Punch needle is a versatile technique, and there are many different ways you can use it to create beautiful designs. Experiment with different yarns and threads, stitch patterns, and color combinations to find the look you like best.
Punch needle art is a pleasurable and relaxing craft that you can quickly pick up with just a couple of practice runs. Jump right in and give it a try! The best way to learn how to needle punch is to simply start punching! It's quite impressive. I hope this has inspired you to explore this captivating art form.